Showing posts with label scrapbooking. Show all posts

Monday, January 15, 2018

Seasonal Expressions Blog Hop

It's so exciting to be blog hopping with the Rose Blossoms to kick off this new year. A Blog Hop is a big circle of blogs all showing something special involving a theme. In this case we're showcasing the four paper packs in the Seasonal Expressions, which is available to order from now through April 30th. We're here to show you just some of what these products can do. If you came from Creating With Liz you're in the right place. You can also start here and hop all the way around.

I'm here to show you just a little something using the Making Waves Paper Pack. I have one single scrapbook page for the end of my 2017 album. You will notice that it has absolutely nothing to do with mermaids or the ocean. That polka dot background piece matches my Winter coat perfectly!!


This layout design is inspired by the layout on page 49 of the SE catalog. 
That column of so many patterns is a great way to show off your paper collection.


In addition to the Paper Pack, I used the Make Waves Complements, the Make Waves Sequins & Gems, the Make Waves Shimmer Trim, White Glitter Paper, a few pieces of Adventure Fundamentals, and some Adventure Cardstock. If you order the Making Waves Workshop Your Way you will get all four items listed plus some coordinating cardstock plus directions to make three different two page layouts. 

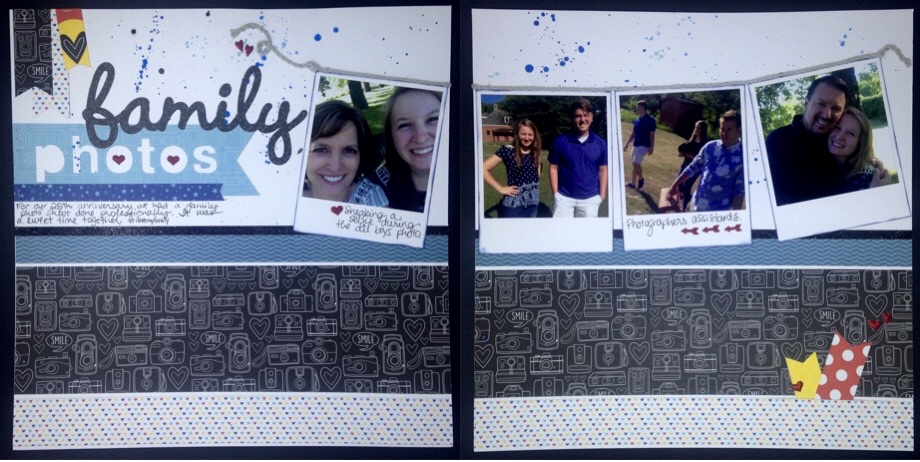
Here are a couple of closer looks at my creation.


I used the Alphabet Thin Cuts to make this number because up until now I didn't realize that I would need the new set of matching Number Thin Cuts too!!! The number set would've been best.


Those flower sequins are especially swoon worthy. I wanted to put them everywhere but I restrained myself and stuck with the centers of the glittery snowflakes.


Just one more close up. There are two stickers here. The sentiment AND the multi colored stars. 
Those purple dots also come with the sequins. 
Such a smart combination of items for such a small amount of $$$.

It's really fun to have used this paper for Winter. Of course there are so many beach and little girl applications but this grown up girl in her down coat taking selfies in the car to try to ignore the temperature is happy with such a perfect ending to my annual album.

It's time to hop on and see what Lynn Darda created in her Bungalow.

Thursday, June 15, 2017

NO WORRIES Rose Blossom Blog Hop


Welcome Hoppers!! If you came from Lynn's Bungalow you have already seen something inspiring. If you're starting here make sure to click the link at the end to keep on hopping all the way through. 

We're featuring the No Worries Paper Pack and coordinating products. Last year I went to Hawaii for the first time so my plan was to use this hop as an excuse to get some layouts done. Here is the only layout I have so far. I just couldn't cover that palm tree paper!! I can't wait to make more with these papers and spectacular coordinating embellishments (Compliments and Sequins).


Here's what I'm featuring today though. It's just ONE card. But it immediately goes into my list of the top ten cards I've ever made. That's not a real list but if I made one this would be on it.


I had to take this cutie outside to get the full effect. When I was in Hawaii my favorite part was the lush greenery. When we drove along the ocean coastline I looked into the jungle on the opposite side of the car! I wanted to stop and take photos of all the plants. Of course you can't stop on those curvy mountainous drives. So those photos don't exist. My yard is kind of reminding me of that beauty right now on a much smaller scale.


Here's a close up of our hula bear.


I dug through a variety of older stamp sets to make this card and I had to use that hibiscus sticker from the retired Calypso complements. BUT you can get this bear stamp with coordinating thin cuts right now and all of the materials used for this card. I made the grass skirt with the White Burlap Ribbon. It can be pulled apart for this fun skirty effect.


Here's one last shot to give you the 3D effect of all this. No foam tape needed! What about those No Worries Sequins though? A little woodgrain and neutrals to match so many things beyond your No Worries projects. I use three different PML cards from the paper pack to make this card. The only thing that might be missing is sunglasses!!

In my opinion the No Worries Workshop Your Way is the best way to get everything necessary to create your heart out with your summer memories.

Thank you for hopping by. Please go see what Kim Hill has made for you. It's bound to be something you want to copy. That's what I think when I see here work. She's so creative.

Friday, June 2, 2017

Day 60


For the past 59 days I have been creating every day for a minimum of 15 minutes. It's part of something called #The100DayProject. I haven't really gotten involved with that community, but if you search the hashtag you're certain to get an eyeful of amazing art. 

In the beginning of this adventure I wandered aimlessly. It was fun to just walk into my little crafty space and see what I would like to do. On Day 39 I made a decision to focus so I went beyond creativity to mixing in some productivity. Here's an example of what my typical 15 minutes turns into. This layout was done at least a year ago. Since I didn't know the exact DOB of the babies in the photos I shoved the layout in a box for "journaling".  This morning I sat down and searched through Facebook for just that little bit of information. The actual journaling took less than two minutes.

TIP OF THE DAY ... even if you aren't able to finish the journaling on a page take the time to write down the facts to store with the pages so that when you come back to add them you actually know what they are. It's a huge time saver at some point!

Saturday, April 15, 2017

SOME KINDA WONDERFUL Rose Blossoms Blog Hop

Are you ready for what might end up being our most colorful blog hop yet? The Rose Blossoms are creating with the Some Kinda Wonderful paper, which you have only two more weeks to add to your collection. After you see everyone's work you will wonder if you need one pack of this paper or two.

If you came from Marg's blog then WOO HOO!! If you're starting here that's great too. Make sure to find the link at the bottom of every blog so you can see everything that people have created with these products. You'll probably want to hop through twice. I always do!

It will come as no surprise that I have layouts for you. Five of them!! I used up most of the paper packet and the complements with these. If you have any preconceived notion about what the theme of this paper is you're probably wrong! LOL!! 

Once you see these layouts below you'll be convinced that it goes with everything!


Thank you for hopping on to my blog today. It's impossible to photograph but the black words and shapes are all sparkly!! I also plowed through a whole pack of black shimmer trim for these. In real life there's lot of glitter in these layouts that range from cat sitting to my son's senior engineering project. And also two of these layouts happened at Christmas time!! Sometimes Christmas calls for amped up versions of red and green!

To get a look at these products and place an order click HERE
You will see the paper pack and down below are the coordinating products.  

Now you're off to enjoy whatever Kim Hill has for you. 
It's sure to be great because that's how she rolls.


Wednesday, March 15, 2017

THIN CUTS Rose Blossoms Blog Hop

It's Blog Hop day ... woo hoo!!  I'm always excited to be a part of this because I know I'm going to see some amazing Close To My Heart art AND be inspired to create above and beyond. You either came from Marg's magnificent blog or you're starting here. Whatever the case make sure to go all the way through and keep on hopping until you've seen all of the wonderful Rose Blossom creations.

We are featuring CTMH Thin Cuts, which are 25% off for the whole month of March. There's plenty of time left to build your thin cut collection. There are two kinds of thin cuts - stand alone shapes and cuts that coordinate with our tremendous stamp sets. I decided to work with the stand alone cuts. BUT I love them all! I'm certain that you'll see some great examples of both in this hop.

Here's my layout ...


This layout features two different sets - Happy & Stars. As you can see I got a LOT of mileage out of just these two sets for this layout. Do you notice how some of the starts are open and some are filled? I love how you can (carefully) use the whole star. That means this set adds up to SIX different stars that are available. {This is a secret, but sometimes I'm not careful and my thin cuts slide off the paper as I'm setting things up to cut. That might just account for the stars that are tucked in here and there or seem to be sliding off the page!! NEVER throw away your apparent mistakes!!}

For old time's sake I took out some paper and a pen to make this. My scrapbooking roots started just like that! The only upgrade here is glitter paper, which I didn't have 20 years ago! I had soooo much fun keeping it simple. AND as busy as it is my photos are still highlighted.

Here's another important thing about thin cuts. There's usually something useful left behind. With the negative space I have seven delightful cards to use for a variety of happy occasions. I've decorated two of them so far, with MORE thin cuts (Basic Hearts and Happy Birthday). This satisfies both of my creative outcomes, scrapbooking AND cards. Win-Win!!


Thank you for taking a look today. Now you get to check out Tweetscraps, where Morgan has surely made something you will want to duplicate. Enjoy!!

Thursday, December 1, 2016

THOUGHTFUL FLOWERS -December Stamp of the Month

It's that time again. The first of the month is a great time to hop with the Rose Blossoms to see some amazing artwork using the current Stamp Of The Month. Look at that variety of flowers!!

Make sure that you look at all of the blogs in this hop to see some stunning artwork with this beautiful set.  I you came from Lynn Darda's blog you're at the next stop.

I made a scrapbook page for you today. I can't wait to make amazing cards with this set but I have sooooooooo many pictures to deal with. I'd love to tell you the story of the mayhem involved in bringing you this page but you'll just have to believe me when I say that this comes to you due based on a creative idea, a series of debacles and a colossal mess! I loved making the mess too.


This is NOT what the idea looked like in my head. My imagination had a lot more variety of colors and more focused attention to each individual flower. But I love this too. Maybe next time I'll have to try the other idea again. All I did here was to paint a colorful area on a piece of watercolor paper and then stamp flowers in black in a fairly random way. You can't really tell from the straight on photo, but there's a little bit of a layering thing going on. I did do a tiny bit of fussy cutting as you can see below.


It was hard to decide if I needed a title for this page or not. And truthfully I ran out of creativity by the time that finishing touch needed to be added. I looked for an easy way out. The Adventure Fundamentals Complements were there for me with work "dream" already cut out in these beautiful glittery letters.  My life is better than I ever would've tried to imagine with this awesome man by my side. We have love and friendship and sooooooooooo much more. I'm truly living the dream.


Make sure to hop over to Kim Hill's blog next. I can't tell you what she made but this time around I know it will have flowers. 


Thursday, September 1, 2016

BLESSED BEYOND MEASURE - September Stamp of the Month Blog Hop


It's that time again ... another awesome blog hop with the Rose Blossoms. Today we're showing you the September Stamp of the Month called "Blessed Beyond Measure". If you came from Marg's blog you're right on track. I can't wait to see how she embossed with these stamps. When you get to the end of this post make sure to click on the link to the next blog. You will want to see ALL of the creative inspirational ideas. Once you get back here you've seen it all.

 This set is just beautiful and so versatile. I'm sure you are going to see some very elegant creations. I have turned in a different direction. That pumpkin caught my eye immediately and I thought about these awesome photos from last October. My hubby and I were chosen to judge this amazing family pumpkin carving contest. I love our badges that provide me with a title AND journaling all in one.
If you've see the new Holiday Expressions you might just recognize this design. It's part of the City Sidewalks Workshop. Do you see the resemblance?

How exciting is it to have a whole bunch of new products to create with starting today. I used paper from the Jeepers Creepers paper pack, along with the embellishments. Never be afraid to mix and match papers with great ideas that you see in our catalogs. 

Here's a closer look at both of the pages.


I really love this layout because I REALLY love this memory. I've been hearing about this family pumpkin carving party heavy duty competition for nearly all of it's 29 years. It's not for people outside of the Matuseski family unless they're judges and we were honored to take on this position for the first time. We weren't even allowed to come until all of the pumpkins were carved and lined up. This way we couldn't play favorites. This is hardcore, which made it pretty stressful to judge. One of my favorite parts is that there was a beautiful scrapbook there showing all the years before this one. I'm thinking we'll be in that scrapbook when the family gets together this year. What a great book of memories they've made. We're so happy to be a little part of that.

Here are a couple of close ups of the stamps I used. Several of them match the Artbooking Cricut cartridge. I also got to play with our awesome new stamp pads in bold new colors.


Thank you so much for stopping by today. Please hop along to Kim Hill's blog to see what sort of awesome item she has created. I've seen a sneak peek and I can't wait to see it myself.


Monday, August 15, 2016

Basic Fundamentals Rose Blossom Blog Hop


Today we bring you projects created with one of two paper packs. These papers can be yours FREE if you take advantage of the Basically The Best special for the month of August.


You may have come here from Marg's wonderful blog, if so I have no doubt it was something inspiring. Maybe you're just getting started. Either way make sure that you hop through all the blogs to see so many wonderful projects to inspire you using these papers.

My paper choice for this hop was the Uptown Fundamentals. This paper pack can be dressed up with sparkly accents or used for everyday activities. I don't have a lot of flashy moments in my life, but my family does play an intense game of bocce ball! 

I let the pictures be the highlight and only added a tiny pop of color here and there. A shout out goes to Karen Pedersen for inspiring me to use dots to create the pop of color. This layout was fast and easy. Those are my favorite kind. I love the neutral palette of this paper pack it really goes with EVERYTHING!!

If you've been following my blog at all you will know that I rarely make just one page. I'm actually learning to do that more often but in the meantime, here's the whole layout.

Check and see what Kim Hill has created. It's sure to be something that will make you want to drop everything and create.

Friday, July 15, 2016

MAGICAL Rose Blossoms Blog Hop

Welcome to another awesome Blog Hop with the Rose Blossoms, featuring the Magical collection from Close To My Heart. If you came here from Marg Van Patton's beautiful blog - YAY! If you're just getting started - YAY! No matter what you have more art ahead of you as you follow the links at the bottom through this great big wonderful circle of creativity.

Today I have a layout for you. 
 
If you're wondering where I got this terrifical layout design, it's from the new Annual Inspirations catalog thats going live for everyone on August 1st. Of course consultants have the privilege of seeing it first and when I saw this layout I knew I just had to make it. Of course the papers aren't the same. Or the stamps (I didn't stamp). OR several other things, but that's the beauty of scraplifting. You take a general idea and make it your own. If you look at page 65 you will see that I followed along pretty closely.  I still don't have the ability to leave a lot of white space so ... paint splatter!!

Here are the two individual pages closer up so you can see the details.


This is one of the easiest layouts to make with what I believe are stunning results. I resisted every urge I had to sneak more photos into the lower sections of the pages because I like to use lots of pictures. That camera paper in Magical is just so adorable though. It would be a shame to cover it up.

Thank you for stopping at my blog today. I can't wait to see what sort of MAGIC Kim Hill has created for you over at Violets and Sunshine. It's sure to inspire!
SaveSave

Thursday, June 16, 2016

Like A Boss


Once Upon A Time  I bought a Cuttlebug ...


That where the story of this blog post begins.
You're in the middle of a blog hop. It's possible that you came here from Becca Whitham's blog. OR you're starting here. Whatever the case, make sure to keep hopping through so you can see everyone's interpretation of embossing. The options are truly endless.

Here's the time line for what you see below.

Black Friday 2015 - Cuttlebug Ordered
January-May 2016 - Folder Collecting
March 2016 - June Blog Hop Sign Up Begins
June 14 AM - I Sign Up In Order To Force Myself into Learning How to Use My Cuttlebug AND Get the Folders Out of Their Packaging
June 15 PM - I Take Out My Blue Scraps and Start the Learning Process. Tried All the Folders I Like the Best and Then Went to Bed
June 16 9:30AM - Decide I Know Enough to Make a Project
9:35AM - Realize That I Have NO Really Good Project Ideas BUT a Photo of Everyone in My Family Wearing Blue
9:40AM - Find Said Photo
9:45AM - Lay Scraps On a Piece of White Cardstock
9:50AM - Glue Scraps Down Without ANY Trimming, Cut a Photo Mat and Wonder What Next
10:00AM - Spot a Pile of Stuff I Found Trying to Clean My Scrapbook Supplies. Clear Letters Are Perfect For This. Glue Letters to One of Embossed Scraps (this was literally the hardest part). Glue Shows Through so I Rub Some Ink Over It. Too Square ... Cut it Into a Banner Shape
10:15AM - Write a Little Journaling From My Heart
10:25AM - Take a Photo of the Finished Page
10:30AM - Transfer Photos to Computer With No Editing
10:35AM - Write This List!

Here you go ...

June 15 PM
9:45AM
9:50AM
10:00 - 10:15AM
This may just be the fastest scrapbook page I ever made but I'm happy with it. It makes me realize that sometimes I just try way too hard. Every page can't be a masterpiece, even if you're going to show it to the public at large. For those out there who feel like you're winging it half the time, you've got a friend in me. I'm sure that every time I run across this page in the album I'll remember the "system" of mayhem I used to create it. For those who are wondering, I'm still not fully confident in my embossing skills. All the folders are open now though so I'm making progress.


Thank You for stopping at my blog today. Keep on hopping to see what Stephanie Davis has created for you. Embossing is a different kind of process for everyone!!

Wednesday, June 15, 2016

Cricut Sampler - Rose Blossoms Blog Hop

Here we are with our mid-month Rose Blossoms Blog Hop. We're teaming up to show you what our fantastic Cricut cartridges can do. Pleeeeeeeeeease be aware that we can't possibly cover the amazingness of these cartridges in just one blog hop. This is a smidgen of their greatness.

If you came from Marg's Marvelous Blog then you're right on track. If you're starting right here that will work. Just make sure to hop all the way through so you don't miss anything.


In my zeal for all things Cricut I thought I would create one project for each of the retiring cartridges we're highlighting. Realism set in pretty fast so I chose to show off three cartridges on one layout. This is the first time I've ever been thankful for my box that says "needs embellishing". I pulled out this layout that had only photos and paper and had a BLAST cutting and pasting all of this Cricut goodness. It's a little crazy but just enough!!


Guess what I like?? A LOT!! Did you say flowers? You nailed it! All of the flowers you see here are from the Art Philosophy cartridge. I could cut and play with those flowers all day long. How awesome would it be to cut and play all day long?

THIS circle of flowers is SO much fun to play with.


THIS border of flowers is ALSO a blast.  Thank You CTMH for offering the Art Philosophy Cricut collection. Why does it have to go away? I don't know but I urge you to get your own before it does. It's probably my favorite.


How about this title? I love a good mix and match title.  I used the letters from the Artiste and the Art Philosophy cartridge to make this one. I mixed and matched so much that I'm just now noticing that I glued the "i" backwards. Most of you never would've noticed but for those of you who would ... oops, I know.


You've see the flowers and the title. Did you notice the images? There's a clock & scissors (Artiste), and a camera (Artfully Sent).

I thought I was going to make my border Juniper colored before I changed my mind to Kraft. You can't let those extra Cricut cuts go to waste. My scissors looked so lonely there before I figured this out.
Artfully Sent may seem like it's just for cards but I use it for scrapbooking elements all the time. There are some VERY unique images there. If you have an Explore you can pick and choose just parts of a cut that you want to use. This camera was part of a card but I isolated it to cut only the camera. Because what's scrapbooking without a camera?


 I'm so happy when one page of a layout can stand alone. This page by itself has everything. Well, everything except that wonderful flower border!!

Thank you so much for stopping today. Please keep hopping to see what the Kreatively Klever Kim has created for you today. I can't wait to see it myself.